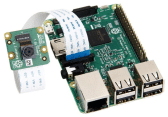
Raspberry Pi camera module
Posted
#1
(In Topic #138)
Regular
Is there an simple example program to use RPi camera module as video streaming like usb webcam?
Thank you for your attention.
Regards
Sony
(Click to enlarge)

Posted

Guru
(Click to enlarge)
raspivid -o - -t 0 -hf -w 640 -h 360 -fps 25 | cvlc -vvv stream:///dev/stdin –sout '#rtp{sdp=rtsp://:8554}' :demux=h264
Change permissions:-
sudo chmod +x startvideofeed.sh
Run the file ./startvideofeed.sh
On the main computer open VLC from the 'Media' menu select 'Open Networkstream'. Enter rtsp://192.168.2.111:8554/ (Where 192.168.2.111 is the IP of the Pi)
Posted
Regular
I mean streaming video with gambas. I has been tried a webcam with gambas to stram the video.
By use drawingarea I can see the current video via webcam.
Now I want to change the webcam with PiCam.
regards
Sony
Posted

Regular
As I mentioned, it is not finished (typical!). It will stream video (which I use to set the camera up and check focus) and it will capture at 90fps, but it doesn't do both at the same time.
To stream, this program simply runs the stream.sh script. You also need to install VLC.
The real-time clock stuff won't make any sense. I use it in conjunction with a simple RPi time server, so I can time stamp files.
My original blog post: Captain Bodgit: Chicks at play: RaspiCam 90fps
Posted
Regular
If the software is a bit old, update:-
sudo rpi-update
sudo apt-get update
sudo apt-get upgrade
Still no /dev/video0?, run: sudo modprobe bcm2835-v4l2
Posted
Regular
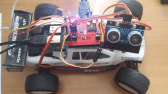
The program MyWebCam_test has been tested and running. My problem is my webcam device have max frame rate at 30 fps, so I decided to change the webcam with PiCam that have frame rate at 90fps. I just need small program like MyWebCam_test by using PiCam as my reference to develop my idea. My project is shoot the image on moving object with camera device.
(Click to enlarge)
Posted
Regular
sony said
…My project is shoot the image on moving object with camera device.
How are you planning to use 90fps video with your Gambas test program?
Posted
Regular
I use gray scale video and by using drawingarea I copy an sample area then count the pixel.
How I count? I copied the image, the corner pixel value as reference value. I get all pixel value in the sample area and compare with reference value. Let's say if pixel value > 10 then I add counter until all pixel value compared.

(Click to enlarge)
Posted
Regular
Now I am able to appearing the actual video with command below:
Shell "raspistill -t 0 -p 454,266,350,350 -ex auto -hf -rot 180 -ifx none"
My problem I can not copying the video to Drawingarea as picture.
Please help me to copying the object outside of form1.form
Sony
Posted
Regular
Base on source code from https://github.com/charlie-ogier/PiCam
I made a small program to copied the screen but the object from picamera can not copied.
please help me.
Sony
Posted
Regular
I think there are Gambas components for both v4l and gstreamer that might be worth exploring.
Posted
Regular
Sorry I'm not use v4l for picamera but v4l for usb webcam.
Posted
Guru
Are you using the Pi and a USB camera or a Pi Camera?
Are you trying to capture the video on the Pi or stream it to another computer?
Posted
Regular
 ….
….I only using RPi.
By using my latest program, I use picamera and RPI but I can not copy the video into drawingarea as picture when a button pressed.
If I have a picture (gray scale/black white) inside drawing area I will count the pixel and compare the pixel value with my reference.
Posted
Guru
Run the program. Take a picture with the size at 800 x 800 then click on the 'Sony' button and you will see the picture you took in a DrawingArea.
Is this what you are looking for?
This will only work on a Raspberry Pi using the picamera
Posted
Regular
I run your program, but that is not I mean. I mean just click the "Sony" button the current running video is show in drawingarea as picture. I do not need read jpg file to visualize into drawingarea, because in the next time I will do million times to take the current running video is show in drawingarea as picture.
regards
Sony
Posted
Regular
Today I read your program carefully and now I understand about using ram drive
 I assume read / write into ram million times is not to make ram damage. So with raspstill command to save image *.jpg file into ram drive and read again then place into drawingarea.
Thank you very much for helping me.
Best regards
Sony
Posted
Guru
You cannot see the 'raspistill' output over SSH so the program takes a photo 75 times a minute that is stored in RAM which is quicker and does no damage to the SD card. The picture can then be seen over a SSH link.
Glad it helped,
Charlie
Posted
Regular
sorry for the messy code
Posted
Guru
I got the LibWiringPi sorted

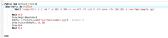
Then at line 78 I got error 'File of directory does not exist'

I REMed that out then I got another error at Line 180, 'Unable to load picture' :?
Code (gambas)
What am I missing?
Posted
Regular
It's like a beginner tech to teacher
I think you must log in to root
1st problem, you should have 'param.par' file in the home folder.
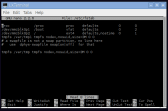
(Click to enlarge)
2nd problem, you must create the 'tmp1' ram drive

(Click to enlarge)
Posted
Guru
I changed all references to the RamDrive to /tmp (not /tmp1) and added the following 'Sub' which I took from 'PiCam'.
Code (gambas)
- sFstab &= "\ntmpfs /var/tmp tmpfs nodev,nosuid,size=3M 0 0\n" 'Add the string to the end of the file
Then call that the 'Sub' : -
I get a picture taken in the RamDrive but I am not sure what is supposed to happen next, I have changed all the values and clicked everything but nothing seems to happen. Are you still trying to display video output?
Posted
Regular
(Click to enlarge)
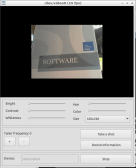
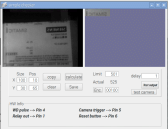
IF you run the program then click the button will shot the camera like below:
(Click to enlarge)
Now you can fill the parameter. Size mean size area copied of image from left to right area, Pos mean position area copied of image from left to right area.
for example if you want capture the position of image with the writing SIMATIC you must set the paramater Pos with value like image below,
press copy button you will copy the necessary position to right area.
(Click to enlarge)
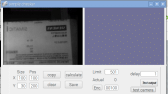
If you give different value in Pos parameter and try step like above will give different pixel count. Just if trigger active and picture shot by camera automatically and if Actual pixel count less then limit the output will be energize.
Posted
Guru
When you want to 'Copy' just use the mouse to select the area to copy and when you release the mouse button it will copy across automatically.
Hope you like it.

(Click to enlarge)
Posted
Regular

(Click to enlarge)
1 guest and 0 members have just viewed this.