Programatically Assign Picture to PictureBox
Posted
#1
(In Topic #595)

Regular
I have a folder home/Pi/GUAGE_IMAGE which contains 100 images G2_00001 through G2_00100 each of a 3D looking Gauge with the needle in 100 different positions. So what I want to do is take some variable… say from a sensor or a slider… then apply math to scale the number to an integer between 1 and 100, and apply that to select the appropriate image file.
In Visual Basic, I would assign a string, let's call it myPIC and assign the built-up string to it. So we would have a value of say 56… and that would be used to create myPIC = "home/Pi/GUAGE_IMAGE/G2_00056.png"
in Visual basic I would do something like GAUGE.picture = myPIC and the appropriate image would be shown.
If I try this in GAMBAS3 it fails saying that it wanted a picture but was given a string.
So… HOW do I tell GAUGE to load in "home/Pi/GUAGE_IMAGE/G2_00056.png" ???
Once I get over that hurdle… I can make interactive graphics that really look great.
Thanks,
Jerry

Posted

Regular
Askjerry said
…in Visual basic I would do something like GAUGE.picture = myPIC and the appropriate image would be shown.
If I try this in GAMBAS3 it fails saying that it wanted a picture but was given a string.
So… HOW do I tell GAUGE to load in "home/Pi/GUAGE_IMAGE/G2_00056.png" ???
Its early in the morning here, but I'd say try something like this:-
Posted
Guru
Askjerry said
In Visual Basic, I would assign a string, let's call it myPIC and assign the built-up string to it. So we would have a value of say 56… and that would be used to create myPIC = "home/Pi/GUAGE_IMAGE/G2_00056.png"
in Visual basic I would do something like GAUGE.picture = myPIC and the appropriate image would be shown.
That's no visual basic i ever used. there was .BackgroundImage and .Image properties neither of which simply took the path string and need proper image objects.
You must respect the datatypes, you should see in the docs that Object.Picture requires a Picture not a String
I guess "Just use a String" is like, Just use the Components section of a forum to ask all your questions,, coding requires a little more precision
 lol only joking dude
 If you type GUAGE.Pic it should pop open the autocomplete box showing .Picture and that it needs a Picture object.
See sap shot.
GUAGE.Picture = Picture.Load(PathToPic)
Posted
Guru
GUAGE.Picture = Picture[sPathStringOfPic].Image.Stretch(64, 64).Picture
Posted
Regular
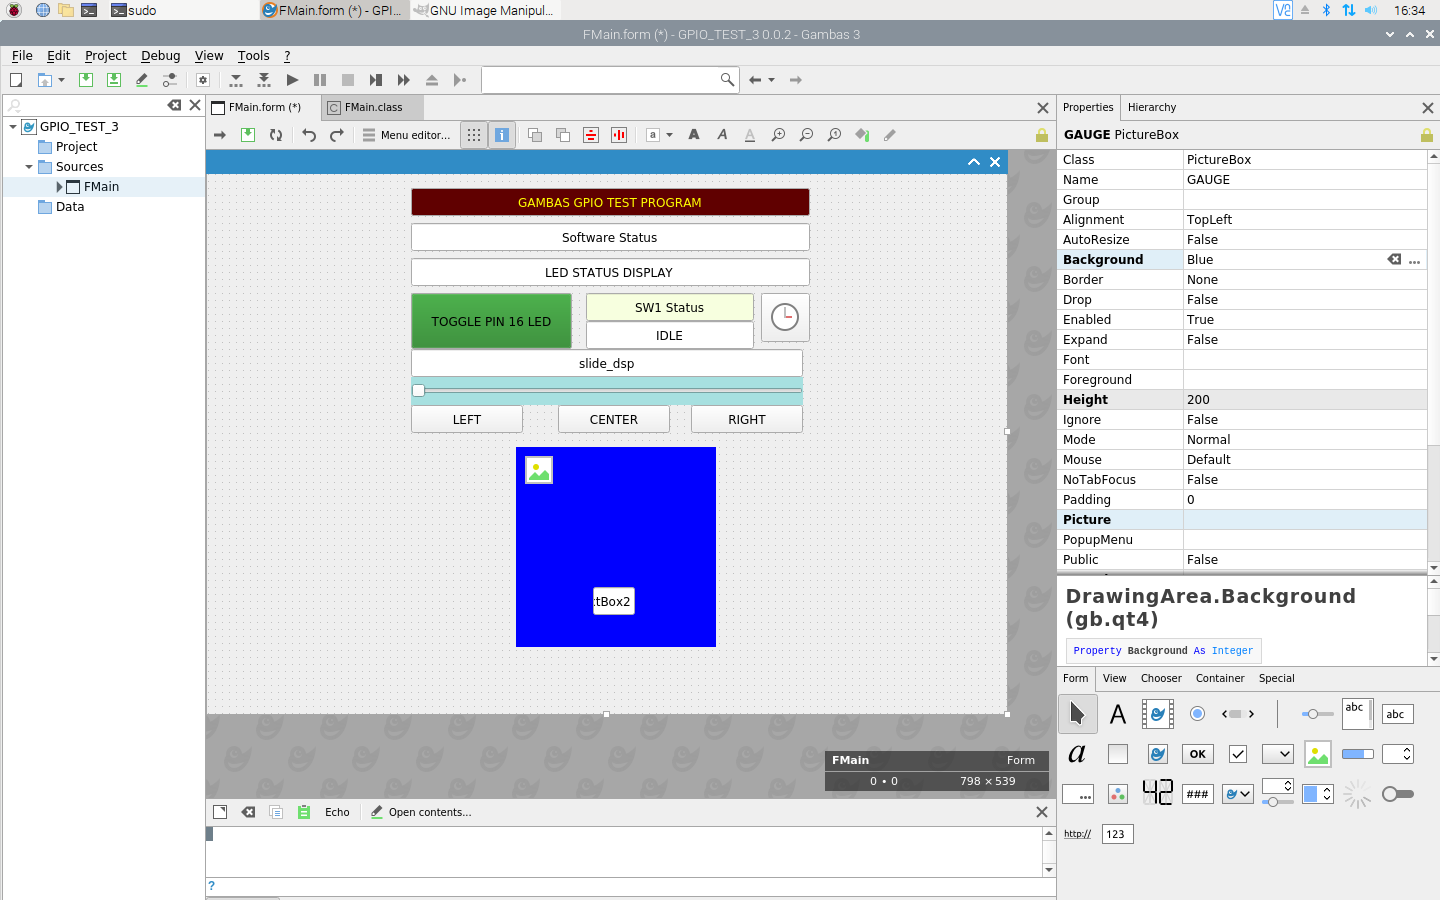
I changed the line to read GAUGE.Picture = Picture.Load("home/pi/G2-IMAGE/G2-00056.png") and ran the program… it popped up with the proper image perfectly placed. ( The images were generated with an animation program and are all exactly 200x200 pixels. ) I should have no problems making the gauge actively follow a slider on the first test… which I'll get to tonight after work.
Eventually, it will all fall together to make a wind tunnel which will measure the lift and drag of a sample wing, change the angle via servo, and report live data. I have the Images, GPIO, Servo, Slider Control, PWM, and Buttons all working perfectly. Next up is to use the I2C command to read the pitot tube and report on airspeed. I think I'll finally be able to pull this project together.
I was using Node Red which is a great program… but I have been using one version of basic or another since 1978.
Thanks Bruce!

Unfortunately, Gambas3 does not support SVG because I have made some really nice control panels in SVG, then used HTML to control them. At some point, I may look into embedding an HTML instead of an image… but for now… this is awesome.
Something you may want to play with if you are into HTML: HTTP://askjerry.info/SVG
Posted
Guru
Gambas requires qt svg libraries
Check put this wiki page…
/comp/gb.qt4/svgimage - Gambas Documentation
Not sure what else svg it supports.
Maybe use Steve's help search tool to find svg related info for gambas.
Best of luck.
Posted
Regular
(Which is a mixture of GREAT and Odd.)
<IMG src="http://askjerry.info/gambas3/forum/Design_Mode.png">
 </IMG>
This is what it looks like in design mode.
Notice the green button, and how the slider looks.
<IMG src="http://askjerry.info/gambas3/forum/Run_Mode.png">
 </IMG>
This is it during a run.
Notice the gauge looks fantastic and works great. (Even have an active text box with the gauge value!)
The odd thing is the button… it went from GREEN to GREY and I do not know why.
I even installed code that when the LED BUTTON is pressed, if the LED is on the button should be GREEN, and otherwise it should be a dark RED.
But no… the code does not generate any errors… it just does not appear to work either.
I tried…
button.background = &H00FF00 → nope.
button.background = 16711689 → nope.
button.background = mongo → nope. (mongo is an integer set to the value of &H00FF00)
So yeah… odd. The button wants to be grey when it's running.
And what is with the slider? I mean… it goes from looking like a slider… to funky. (Still works tho.)
If you like the gauge images… here ya go → http://askjerry.info/gambas3/forum/G2-IMAGE.zip
Ok… I'm gonna tinker some more.
Jerry
Posted
Guru
you'll find it looks different with qt or gtk3
if your app is qt you should run gambas in qt mode too just so it looks more like your design
I hope you are not using..
Button.Background
Button is the name of the object class not the name of your button.
if your buttons name is Button1 then you must use Button1.Background
It's probably your code to change the colours causing the glitch.
post the code fr changing button colour here and we can see where the problem is.
Posted
Regular
The color change code was not added until today… so that's not the reason… I only really noticed the button was not green today and started thinking, "maybe I should specify it in code."
This is a test program to learn the different functions… the actual code is as follows.
Code
			' Gambas class file

' Load the pigpio library
Library "/usr/local/lib/libpigpio"

' Set up the calls
Public Extern gpioInitialise() As Integer   'call at start of program to initialise
Public Extern gpioTerminate() As Integer    'call at end of program to release resources and terminate threads
Public Extern gpioVersion() As Integer
Public Extern gpioHardwareRevision() As Integer
Public Extern gpioSetMode(iPin As Integer, iMode As Integer) As Integer
Public Extern gpioRead(iPin As Integer) As Integer
Public Extern gpioWrite(iPin As Integer, iLevel As Integer) As Integer
Public Extern gpioSetPullUpDown(iPin As Integer, iMode As Integer) As Integer
Public Extern gpioServo(servo_pin As Integer, servo_value As Integer) As Integer

' Define constants
Const PI_INPUT As Integer = 0
Const PI_OUTPUT As Integer = 1
Const PI_PUD_UP As Integer = 2
Const PI_PUD_DOWN As Integer = 1
Const PI_PUD_OFF As Integer = 0

' Public Variables

Public Sub Form_Open()
  Dim intReply As Integer
  intReply = gpioInitialise()
  Dim sw1_pin As Integer
  sw1_pin = 26
  gpioSetMode(sw1_pin, PI_INPUT)
  gpioSetPullUpDown(sw1_pin, PI_PUD_UP)

  If intReply < 0 Then
    Label1.Text = "Failed: must be run as root"
    BTN_LED_16.Enabled = False
  Else
    BTN_LED_16.Enabled = True
    Label1.Text = "Initialised: pigpio version no: " & intReply
    Me.Text = "Pi hardware rev: " & Hex$(gpioHardwareRevision())
    Me.Text &= ",  pigpio vers: " & gpioVersion()
    Me.Tag = 0
  Endif

servoslider.value = 1500
GAUGE.Picture = Picture.Load("/home/pi/G2-IMAGE/G2-0050.png")

End

Public Sub Form_Close()
   gpioTerminate()
End

Public Sub BTN_LED_16_Click()
  Dim LED_Pin As Integer
  LED_Pin = 16
  Dim LED_STATUS As Integer

  gpioSetMode(LED_Pin, PI_OUTPUT)
  LED_STATUS = gpioRead(LED_Pin)

  If LED_STATUS = 0 Then
    LED_STAT_DSP.Text = "LED 16 ON"
    gpioWrite(LED_Pin, 1)
    BTN_LED_16.Background = &H00ff00
  Else
    LED_STAT_DSP.Text = "LED 16 OFF"
    gpioWrite(LED_Pin, 0)
    BTN_LED_16.Background = &Hff0000

  Endif
End

Public Sub Timer1_Timer()
Dim s1_value As Integer
Dim sw1_pin As Integer

sw1_pin = 26
s1_value = gpioRead(sw1_pin)
If s1_value = 0 Then
  SW1_STATUS.Text = "PRESSED"
Else
  SW1_STATUS.Text = "IDLE"
Endif

End

Public Sub servoslider_Change()
Dim pic_name As String
Dim pic_number As Variant
Dim mydata As String

slide_dsp.Text = servoslider.Value
gpioServo(17, servoslider.Value)
pic_number = servoslider.Value - 599
pic_number = pic_number * (100 / 1801)
If pic_number < 1 Then pic_number = 1
TextBox2.Text = Int(pic_number)
pic_name = "/home/pi/G2-IMAGE/G2-" & Format(pic_number, "0000") & ".png"

GAUGE.Picture = Picture.Load(pic_name)

End


Public Sub btn_servo_center_Click()
  servoslider.value = 1500
End

Public Sub btn_servo_left_Click()
  servoslider.value = 600
End

Public Sub btn_servo_right_Click()
  servoslider.value = 2400
End
As for your comment, "if your app is qt you should run gambas in qt mode too just so it looks more like your design"
I'm not really sure what you mean… I'm typing "sudo gambas3" in a terminal to get the program started… after that I jumped in hard and fast to get the pigpio operational and start testing functions. Honestly… I'm amazed at how fast I got as far as I did with this. I've been programming with Gambas about 3 days.
Posted
Guru
Your colour setting &H00ff00
Should have a & at the end too.
&H00ff00&
Try that
Posted
Guru
Askjerry said
I was using pseudo code to describe the button as I was typing from my laptop in a different area.
The color change code was not added until today… so that's not the reason… I only really noticed the button was not green today and started thinking, "maybe I should specify it in code."
As for your comment, "if your app is qt you should run gambas in qt mode too just so it looks more like your design"
I'm not really sure what you mean… I'm typing "sudo gambas3" in a terminal to get the program started… after that I jumped in hard and fast to get the pigpio operational and start testing functions. Honestly… I'm amazed at how fast I got as far as I did with this. I've been programming with Gambas about 3 days.
Yes the Gambas IDE and the help popups practically guide you through it.
It's an awesome development environment for coders of all levels.
do you have to run gambas as root?
check out these alternative commands…
env GB_GUI="gb.qt5" gambas3
or
env GB_GUI="gb.qt5" sudo gambas3
or
env GB_GUI="gb.gtk3" sudo gambas3
running gambas that way you can control what gui interface gambas itself uses.
also if you drag-n-drop the gambas menu icon to your desktop panel you can right click the icon and select the gui simply

<VIDEO content="http://bws.org.uk/images/screenrecord-2021-02-25_15.37.32.mp4">[video]
Posted
Regular
In the design window I can select a color, even type in a value… it's happy as a clam. Run the program.. grey.
I can have any color I want as long as it is grey apparently.
Ironically, if I use…
BTN_LED_16.Foreground = &H00ff0000
or…
BTN_LED_16.Foreground = &H0000ff00
The foreground text and border are quite happy to change as expected. :roll:
There is another method… thinking outside the box a bit… I could just make a PictureBox and assign it an image of a button… then swap the image as needed. An image will support a routine… so I can do a _MouseDown to make the change.
I just tried it… made a PictureBox, assigned the background color as blue…
Created a routine Picturebox_OnMouseClick() and told it to be either Red or Green depending on a Public variable I created… and had it toggle the variable from 1 to 0.
When I click on it, it toggles between Green and Red perfectly. I'm pretty sure that if I made a transparent image with text… it would work.
It's an odd way to do it… but functional. For now the great button is fine… but I've made plenty of button images for my CNC projects so that's an option if I want 3D shaded buttons that appear to stand our or be recessed into the menu. Hummm… now I want that. :geek:
Posted
Regular
Yes, on the Raspberry Pi using the piGPIO library… to allow the use of the GPIO, you MUST run in ROOT or it will give you a failure.
I'll attempt the suggestions you face me and see if they address any of the issues. Likely I'll have to put "sudo" in front to get the result.
I'll let you know. (Thanks!)
UPDATE: I tried all three… they all looked exactly the same.
It's ok… I'll update my code. For me the score is like this…
10,000 Points = Get GPIO to work. (Accomplished)
5,000 Points = Get Servo and Graphics to work. (Accomplished)
9,000 Points = Get Serial and/or I2C working (Next)
500 Points = Get the button to change color instead of a work-a-round.
So I'm ahead of the game still.
Posted
Guru
Askjerry said
Ironically, if I use…
BTN_LED_16.Foreground = &H00ff0000
or…
BTN_LED_16.Foreground = &H0000ff00
The foreground text and border are quite happy to change as expected. :roll:
That's more than ironic that's crazy talk

the change you "expect" there is quite incorrect.
hexidecimal values begin with &H and end with &
Your code is wrong as is your statement.
Not usng a & at the end of a hex value really does not get "expected" results unless the expected result is an incorrect value.
i'm not sure what your problem is.
maybe that button just does not want to change for you
Posted
Regular
BruceSteers said
…do you have to run gambas as root?Askjerry said
… I'm typing "sudo gambas3" in a terminal to get the program started…
Its true that accessing i/o in Linux requires special privileges, and using root in the short term to develop the system is fine. But in the longer term you should probably find an alternative workaround.
What I do is modify the sudoers file, as this is a fairly easy approach to implement and understand. At least doing this limits elevated privileges to one user on one program. So something like:-
askjerry ALL=NOPASSWD: /usr/local/bin/pigpio
…should work (assuming username and pigpio path were correct).
See my notes towards the end of my blog post: Captain Bodgit: RaspberryPi Web server: GPIO access
Or you may be able just to add yourself to a user group which already has access to Linux i/o (possibly the dialout group). For example, just open a terminal and type something like:-
sudo usermod -a -G dialout askjerry
Or there maybe some other fancy-pants way of avoiding using full-blown root!
Posted
Regular
It's all in this video if you are interested…
1 guest and 0 members have just viewed this.