DrawingArea PAINT.ROTATE(RAD(x))
Posted
#1
(In Topic #862)

Regular
Code
			Public Sub drawingarea1_Draw()
  Dim cx As Integer = DrawingArea1.W / 2  'Horizontal Center
  Dim cy As Integer = DrawingArea1.h / 2  'Vertical Center

  With Paint
    ' The drawing area is 200 x 200 pixels
    '-- Make Text --
    .Brush = Paint.Color(&H00000000)
    .Text("Drawing Area 1", cx, cy + 80, 000, 000, 3)
    .fill

    '-- Make Filled Area --
    .Brush = Paint.Color(&H006666ff)
    .MoveTo(CX, CY - 80)
    .LineTo(cx + 10, cy)
    .LineTo(cx, cy + 20)
    .LineTo(cx - 10, cy)
    .LineTo(cx, cy - 80)
    .fill

    ' -- Make Outline --
    .Brush = Paint.Color(&H00000000)
    .MoveTo(CX, CY - 80)
    .LineTo(cx + 10, cy)
    .LineTo(cx, cy + 20)
    .LineTo(cx - 10, cy)
    .LineTo(cx, cy - 80)
    .lineto(cx, cy + 20)
    .stroke

    ' Finish the process
    .end
  End With
End
I see there is a ROTATE command that uses RADIANS… so the command it's self would be .ROTATE(RAD(A)) where "A" would be the angle in degrees.
The issue is… HOW do I use it???
My thinking is that you would define your "stuff" in the drawing area and rotate it… like this…
Code
Public Sub drawingarea1_Draw()
  Dim cx As Integer = DrawingArea1.W / 2  'Horizontal Center
  Dim cy As Integer = DrawingArea1.h / 2  'Vertical Center

    ' -- Make Outline --
    .Brush = Paint.Color(&H00000000)
    .MoveTo(CX, CY - 80)
    .LineTo(cx + 10, cy)
    .LineTo(cx, cy + 20)
    .LineTo(cx - 10, cy)
    .LineTo(cx, cy - 80)
    .lineto(cx, cy + 20)

    .Rotate(Rad(45))
    .stroke

    ' Finish the process
    .end
  End With
End
But no… it doesn't work. And the documentation is underwhelming… really needs samples. Seriously.
Modifies the current transformation matrix (CTM) by rotating the user-space axes by angle radians. The rotation of the axes takes places after any existing transformation of user space. The rotation direction for positive angles is from the positive X axis toward the positive Y axis.
Angle : angle (in radians) by which the user-space axes will be rotated.
Can someone show me how to use this???
I mean for now, I'm using math that would be hard for my students to comprehend…
Code
			'------------------------------------------------------------------------------------------
Public Sub Form_Open()

End

Public Sub DrawingArea1_Draw()
  Dim cx As Integer = DrawingArea1.W / 2  'Horizontal Center
  Dim cy As Integer = DrawingArea1.h / 2  'Vertical Center
  Dim ca As Integer = Slider1.Value       'Active Angle Movement
  Dim co As Integer = 0                   'Angular Offset -> Adjust starting point
  Dim x1 As Integer = 0                   'X Draw Point
  Dim y1 As Integer = 0                   'Y Draw Point
  With Paint
    ' The drawing area is 200 x 200 pixels
    '-- Make Text --
    .Brush = Paint.Color(&H00000000)
    .Text("Angle: " & ca, cx, cy + 80, 000, 000, 3)
    .fill

    ' -- Make Fill --
    .Brush = Paint.Color(&H0066FF66)
    x1 = Cos(Rad(ca - 90 - co)) * 80 + cx
    y1 = Sin(Rad(ca - 90 - co)) * 80 + cy
    .MoveTo(x1, y1)
    x1 = Cos(Rad(ca - 0 - co)) * 10 + cx
    y1 = Sin(Rad(ca - 0 - co)) * 10 + cy
    .LineTo(x1, y1)
    x1 = Cos(Rad(ca + 90 - co)) * 20 + cx
    y1 = Sin(Rad(ca + 90 - co)) * 20 + cy
    .LineTo(x1, y1)
    x1 = Cos(Rad(ca + 180 - co)) * 10 + cx
    y1 = Sin(Rad(ca + 180 - co)) * 10 + cy
    .LineTo(x1, y1)
    x1 = Cos(Rad(ca - 90 - co)) * 80 + cx
    y1 = Sin(Rad(ca - 90 - co)) * 80 + cy
    .LineTo(x1, y1)
    ' Center line - Not Required
    .fill

    ' -- Make Outline --
    .Brush = Paint.Color(&H00000000)
    x1 = Cos(Rad(ca - 90 - co)) * 80 + cx
    y1 = Sin(Rad(ca - 90 - co)) * 80 + cy
    .MoveTo(x1, y1)
    x1 = Cos(Rad(ca - 0 - co)) * 10 + cx
    y1 = Sin(Rad(ca - 0 - co)) * 10 + cy
    .LineTo(x1, y1)
    x1 = Cos(Rad(ca + 90 - co)) * 20 + cx
    y1 = Sin(Rad(ca + 90 - co)) * 20 + cy
    .LineTo(x1, y1)
    x1 = Cos(Rad(ca + 180 - co)) * 10 + cx
    y1 = Sin(Rad(ca + 180 - co)) * 10 + cy
    .LineTo(x1, y1)
    x1 = Cos(Rad(ca - 90 - co)) * 80 + cx
    y1 = Sin(Rad(ca - 90 - co)) * 80 + cy
    .LineTo(x1, y1)
    x1 = Cos(Rad(ca + 90 - co)) * 20 + cx
    y1 = Sin(Rad(ca + 90 - co)) * 20 + cy
    .LineTo(x1, y1)
    .stroke

    ' Finish the process
    .end
  End With
End

Public Sub Slider1_Change()
  drawingarea1.refresh
End
Just make a 200x200 drawingarea and add a slider set 0 to 360. But yeah… I'd love to use the ROTATE command.


Posted

Guru
Code (gambas)
- ' Gambas class file
- ''USE gb.gui.qt for best results
- DrawingArea1 As DrawingArea
- .Height = 300
- .Width = 300
- .Padding = 5
- .Arrangement = Arrange.Vertical
- .Center
- .Height = 28
- .MaxValue = 630
- DrawingArea1.Refresh
- Wait 0.1
- Slider1.value = 314
- DrawingArea1.Clear
- With Paint
- ' The drawing area is 200 x 200 pixels
- '-- Make Text --
- .Begin(DrawingArea1)
- .Translate(cx, cy)
- .Rotate(-Slider1.value / 100) ''Slider1 value from 0 to 630
- .Translate(-cx, -cy)
- .MoveTo(cx, cy)
- .Brush = Paint.Color(&H00000000)
- .Text("Drawing Area 1", cx, cy + 80, 0, 0, 3)
- '-- Make Filled Area --
- '.Brush = Paint.Color(&H006666ff)
- .Brush = Paint.Color(&H00FF0000)
- .MoveTo(CX, CY - 80)
- .LineTo(cx + 10, cy)
- .LineTo(cx, cy + 20)
- .LineTo(cx - 10, cy)
- .LineTo(cx, cy - 80)
- .fill
- ' -- Make Outline --
- .Brush = Paint.Color(&H00000000)
- .MoveTo(CX, CY - 80)
- .LineTo(cx + 10, cy)
- .LineTo(cx, cy + 20)
- .LineTo(cx - 10, cy)
- .LineTo(cx, cy - 80)
- .lineto(cx, cy + 20)
- .stroke
- .end
Posted
Regular
<COLOR color="#BF0000">NULL OBJECT in FMAIN 36</COLOR>
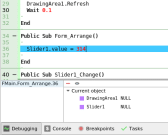
(Click to enlarge)
Bummer.
 I do appreciate the effort… maybe I'm just missing something small. :roll:
 It also appears as if your code is rotating the entire drawingarea… (I could be wrong) my method only alters the data for 5 points as it draws the shape… an order of magnitude less calculations.
Not sure why it failed, nor why you are creating the slider and drawing area within the program instead of placing and scaling on the form where you want them, setting all parameters, then just drawing the simple lines. I suppose I have much to learn.
My method does work… I was hoping for a more simple way of doing it… but it looks like my method and yours are equally complex.
<IMG src="https://forum.gambas.one/download/file.php?id=1067">
The results are pretty good however… once you overlay it on another graphic.
If you create a QT project, then set the form up with
drawingarea1 200x200 pixels
drawingarea2 200x200 pixels
slider1 0 to 360
Then paste in this code…
Code
			' Gambas class file
'------------------------------------------------------------------------------------------
Public Sub Form_Open()


End

Public Sub drawingarea1_Draw()
  Dim cx As Integer = DrawingArea1.W / 2  'Horizontal Center
  Dim cy As Integer = DrawingArea1.h / 2  'Vertical Center
  Dim ca As Integer = 0                   'Angle Offset
  With Paint
    ' The drawing area is 200 x 200 pixels
    '-- Make Text --
    .Brush = Paint.Color(&H00000000)
    .Text("Drawing Area 1", cx, cy + 80, 000, 000, 3)
    .fill

    '-- Make Filled Area --
    .Brush = Paint.Color(&H006666ff)
    .MoveTo(CX, CY - 80)
    .LineTo(cx + 10, cy)
    .LineTo(cx, cy + 20)
    .LineTo(cx - 10, cy)
    .LineTo(cx, cy - 80)
    .fill

    ' -- Make Outline --
    .Brush = Paint.Color(&H00000000)
    .MoveTo(CX, CY - 80)
    .LineTo(cx + 10, cy)
    .LineTo(cx, cy + 20)
    .LineTo(cx - 10, cy)
    .LineTo(cx, cy - 80)
    .lineto(cx, cy + 20)
    .stroke

    ' Finish the process
    .end
  End With
End

Public Sub DrawingArea2_Draw()
  Dim cx As Integer = DrawingArea2.W / 2  'Horizontal Center
  Dim cy As Integer = DrawingArea2.h / 2  'Vertical Center
  Dim ca As Integer = Slider1.Value       'Active Angle Movement
  Dim co As Integer = 0                   'Angular Offset -> Adjust starting point
  Dim x1 As Integer = 0                   'X Draw Point
  Dim y1 As Integer = 0                   'Y Draw Point
  With Paint
    ' The drawing area is 200 x 200 pixels
    '-- Make Text --
    .Brush = Paint.Color(&H00000000)
    .Text("Angle: " & ca, cx, cy + 80, 000, 000, 3)
    .fill

    ' -- Make Fill --
    .Brush = Paint.Color(&H0066FF66)
    x1 = Cos(Rad(ca - 90 - co)) * 80 + cx
    y1 = Sin(Rad(ca - 90 - co)) * 80 + cy
    .MoveTo(x1, y1)
    x1 = Cos(Rad(ca - 0 - co)) * 10 + cx
    y1 = Sin(Rad(ca - 0 - co)) * 10 + cy
    .LineTo(x1, y1)
    x1 = Cos(Rad(ca + 90 - co)) * 20 + cx
    y1 = Sin(Rad(ca + 90 - co)) * 20 + cy
    .LineTo(x1, y1)
    x1 = Cos(Rad(ca + 180 - co)) * 10 + cx
    y1 = Sin(Rad(ca + 180 - co)) * 10 + cy
    .LineTo(x1, y1)
    x1 = Cos(Rad(ca - 90 - co)) * 80 + cx
    y1 = Sin(Rad(ca - 90 - co)) * 80 + cy
    .LineTo(x1, y1)
    ' Center line - Not Required
    .fill

    ' -- Make Outline --
    .Brush = Paint.Color(&H00000000)
    x1 = Cos(Rad(ca - 90 - co)) * 80 + cx
    y1 = Sin(Rad(ca - 90 - co)) * 80 + cy
    .MoveTo(x1, y1)
    x1 = Cos(Rad(ca - 0 - co)) * 10 + cx
    y1 = Sin(Rad(ca - 0 - co)) * 10 + cy
    .LineTo(x1, y1)
    x1 = Cos(Rad(ca + 90 - co)) * 20 + cx
    y1 = Sin(Rad(ca + 90 - co)) * 20 + cy
    .LineTo(x1, y1)
    x1 = Cos(Rad(ca + 180 - co)) * 10 + cx
    y1 = Sin(Rad(ca + 180 - co)) * 10 + cy
    .LineTo(x1, y1)
    x1 = Cos(Rad(ca - 90 - co)) * 80 + cx
    y1 = Sin(Rad(ca - 90 - co)) * 80 + cy
    .LineTo(x1, y1)
    x1 = Cos(Rad(ca + 90 - co)) * 20 + cx
    y1 = Sin(Rad(ca + 90 - co)) * 20 + cy
    .LineTo(x1, y1)
    .stroke

    ' Finish the process
    .end
  End With
End

Public Sub Slider1_Change()
  drawingarea2.refresh
End
You can tinker with it.
Once set up there is only 1 other thing to update/change as needed…
Dim co As Integer = 0 'Angular Offset -> Adjust starting point
So if you wanted a range of 0 to 120 for example… you could offset by -60 and the pointer would be adjusted in rotation… like this…
Dim co As Integer = -60 'Angular Offset -> Adjust starting point
I'll be building on the graphics in my video series… eventually with a single large drawing area… and all the pointers and "stuff" laid out where needed. Or… I dunno… might leave them separate so I can tweak on them individually. Only time will tell.

Thanks,
Jerry
Posted
Banned
So create a new Image to overlay instead, use your routine to paint the needle, then simply use the image rotation features.
Also is your conversion from value to degree correct?
Here is how i convert a slider value into an angle and back again for a program i made that uses an image of a rotational knob as a slider…
Maybe the code will help?
Note. $iCircle is 360 by default and defines how big the circle is.
It's used like this…
RotateImage() makes a copy of the image rotated and extracts the original size from center.
watch out for rotate shrinking the image. an image is square and if rotated and painted normally it will shrink so the corners still fit inside the square.
you can get over it by copying the image as i do in the RotateImage() method, make a copy of it rotated then extract the original area size (Me.W,Me.H) from the center point.
Code (gambas)
Can post the whole ImageSpinner project if you wanna gander?
Posted
Guru
I created a new file in QT, pasted in the code and attempted to run it…
NULL OBJECT in FMAIN 36
I have tried the code again and it works for me. See here.
It should still work without the Public Sub Form_Arrange() routine if that helps.
Posted
Regular
Cogier - Not sure what went on… but as I thought… yours rotates the entire image.
With my method… I can have the overlay (drawingarea) do multiple pointers, text, and even "fluid levels" (working on that) all on ONE image if I like. I'm just going to need to use my current math and at least for now abandon the ROTATE command. So now I need to learn the rectangle and ellipse commands for my next steps.
And if I don't use your method (at least for this project) it does not mean that I don't appreciate your help!
I may use it in another project which has different graphic requirements.
Thank you,
Jerry

Posted
Guru
Cogier - Not sure what went on… but as I thought… yours rotates the entire image.
A minor change to the program, and I think this is what you want:-
Video here
Code (gambas)
- ' Gambas class file
- ''USE gb.gui.qt for best results
- DrawingArea1 As DrawingArea
- .Height = 300
- .Width = 300
- .Padding = 5
- .Arrangement = Arrange.Vertical
- .Center
- .Height = 28
- .MaxValue = 630
- DrawingArea1.Refresh
- Wait 0.1
- Slider1.value = 1
- DrawingArea1.Clear
- With Paint
- ' The drawing area is 200 x 200 pixels
- '-- Make Text --
- .Begin(DrawingArea1)
- .MoveTo(cx, cy)
- .Brush = Paint.Color(&H00000000)
- .Text("Drawing Area 1", cx, cy + 80, 0, 0, 3)
- .Fill
- .Stroke
- '-- Make Filled Area --
- '.Brush = Paint.Color(&H006666ff)
- .Translate(cx, cy)
- .Rotate(-Slider1.value / 100) ''Slider1 value from 0 to 630
- .Translate(-cx, -cy)
- .Brush = Paint.Color(&H00FF0000)
- .MoveTo(CX, CY - 80)
- .LineTo(cx + 10, cy)
- .LineTo(cx, cy + 20)
- .LineTo(cx - 10, cy)
- .LineTo(cx, cy - 80)
- .fill
- ' -- Make Outline --
- .Brush = Paint.Color(&H00000000)
- .MoveTo(CX, CY - 80)
- .LineTo(cx + 10, cy)
- .LineTo(cx, cy + 20)
- .LineTo(cx - 10, cy)
- .LineTo(cx, cy - 80)
- .lineto(cx, cy + 20)
- .stroke
- .end
Posted
Regular
<COLOR color="#BF0000">Ambiguous Expression. Please use brackets in FMain.class : 62</COLOR>
I think this is close… certainly less than all the math I was using to locate every graphics point.
I also just started another thread because I think there is a way to define a shape or polygon… then just tell it, put it here and at this angle.
Thanks for your help.
Jerry
Posted
Regular
Code
			' Gambas class file

Public Sub DRW_1_Draw()
Dim x, y As Integer
' DEFINE CENTER OF ROTATION
x = DRW_1.Width / 2
y = DRW_1.Height / 2

  With Paint
    ' SET CENTER POINT
    .Translate(x, y)
    ' ROTATE THE WHOLE DRAWING ENVIONMENT
    .rotate(Rad(Slider3.value))
    ' Draw Filled Pointer with pivot point at (0,0)
    .brush = Paint.Color(&hffff00)
    .MoveTo(0, -80)
    .LineTo(-20, 0)
    .LineTo(0, 20)
    .LineTo(20, 0)
    .LineTo(0, -80)
    .fill
    ' Draw Outlined Pointer with pivot point at (0,0)
    .brush = Paint.Color(&h0000FF)
    .MoveTo(0, -80)
    .LineTo(-20, 0)
    .LineTo(0, 20)
    .LineTo(20, 0)
    .LineTo(0, -80)
    .stroke
    ' Finish Drawing
    .End
  End With
End

' SLIDER SET to -360 to +360 for data to test rotation
Public Sub Slider3_Change()
TextLabel3.Text = Format(Slider3.Value, "000") & " DEG"
DRW_1.Refresh
End

' SLIDER REST TO ZERO BUTTON
Public Sub Button1_Click()
  Slider3.Value = 0
End

'EXIT THE PROGRAM BUTTON
Public Sub BTN_EXIT_Click()
  FMain.Close
End
I had BORDER ON - PLAIN for the drawing area… I noticed that the whole square was rotating inside the "window" where I had originally placed the DrawingArea…
It wasn't until I saw your TRANSLATE(x,y) function that I figured it out… draw the thing around the (0,0) point… then shift and rotate it where you want it.
Thanks for the help!!!!!!!!!!!!!
Jerry
<COLOR color="#0040FF">UPDATE: </COLOR>I have a newer version that is just beautiful… I am attaching the file for your enjoyment.
GAMBAS Sample Gauge Fully Documented.
This gauge is made in layers…
<LIST>
- <LI>On the bottom - Gauge Image - A very detailed colorful gauge.</LI>
<LIST>
- <LI>Next up is a transparent drawing area to hold the pointer which is redrawn each time.</LI>
<LIST>
- <LI>Over that is a lable to hold the display text which shows the speed in kp/h fully formatted.</LI>
<LIST>
- <LI>At the top of the stack is a transparent PNG which contains the pointer cover, a gradient circle. It can also contain a lens flare if you like.</LI>
1 guest and 0 members have just viewed this.